通过使用Spring Boot RESTful Web服务,您可以发送包含Gmail传输层安全性的电子邮件.在本章中,让我们详细了解如何使用此功能.
首先,我们需要在构建配置文件中添加Spring Boot Starter Mail依赖项.
Maven用户可以将以下依赖项添加到pom.xml文件中.
<dependency> <groupId>org.springframework.boot</groupId> <artifactId>spring-boot-starter-mail</artifactId></dependency>
Gradle用户可以在build.gradle文件中添加以下依赖项.
compile('org.springframework.boot:spring-boot-starter-mail')给出主Spring Boot应用程序类文件的代码低于 :
package com.it1352.emailapp; import org.springframework.boot.SpringApplication;import org.springframework.boot.autoconfigure.SpringBootApplication;@SpringBootApplicationpublic class EmailappApplication { public static void main(String[] args) { SpringApplication.run(EmailappApplication.class, args); }}您可以编写一个简单的Rest API来发送到Rest Controller类文件中的电子邮件,如图所示.
package com.it1352.emailapp; import org.springframework.web.bind.annotation.RequestMapping;import org.springframework.web.bind.annotation.RestController;@RestControllerpublic class EmailController { @RequestMapping(value = "/sendemail") public String sendEmail() { return "Email sent successfully"; } }您可以编写一个方法来发送带有附件的电子邮件.定义mail.smtp属性并使用PasswordAuthentication.
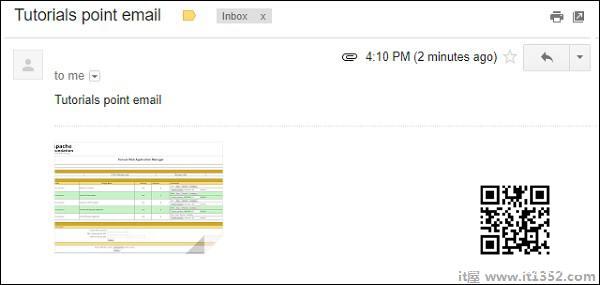
private void sendmail() throws AddressException, MessagingException, IOException { Properties props = new Properties(); props.put("mail.smtp.auth", "true"); props.put("mail.smtp.starttls.enable", "true"); props.put("mail.smtp.host", "smtp.gmail.com"); props.put("mail.smtp.port", "587"); Session session = Session.getInstance(props, new javax.mail.Authenticator() { protected PasswordAuthentication getPasswordAuthentication() { return new PasswordAuthentication("it1352@gmail.com", "<your password>"); } }); Message msg = new MimeMessage(session); msg.setFrom(new InternetAddress("it1352@gmail.com", false)); msg.setRecipients(Message.RecipientType.TO, InternetAddress.parse("it1352@gmail.com")); msg.setSubject("Tutorials point email"); msg.setContent("Tutorials point email", "text/html"); msg.setSentDate(new Date()); MimeBodyPart messageBodyPart = new MimeBodyPart(); messageBodyPart.setContent("Tutorials point email", "text/html"); Multipart multipart = new MimeMultipart(); multipart.addBodyPart(messageBodyPart); MimeBodyPart attachPart = new MimeBodyPart(); attachPart.attachFile("/var/tmp/image19.png"); multipart.addBodyPart(attachPart); msg.setContent(multipart); Transport.send(msg); }现在,从Rest API调用上面的sendmail()方法,如图所示 :
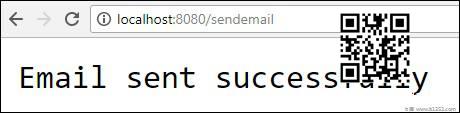
@RequestMapping(value = "/sendemail")public String sendEmail() throws AddressException, MessagingException, IOException { sendmail(); return "Email sent successfully"; }注意 : 在发送电子邮件之前,请关闭Gmail帐户设置中允许安全性较低的应用.
完整的构建配置文件如下所示.
Maven - pom.xml
<?xml version = "1.0" encoding = "UTF-8"?><project xmlns = "http://maven.apache.org/POM/4.0.0" xmlns:xsi = "http://www.w3.org/2001/XMLSchema-instance" xsi:schemaLocation = "http://maven.apache.org/POM/4.0.0 http://maven.apache.org/xsd/maven-4.0.0.xsd"> <modelVersion>4.0.0</modelVersion> <groupId>com.IT屋</groupId> <artifactId>emailapp</artifactId> <version>0.0.1-SNAPSHOT</version> <packaging>jar</packaging> <name>emailapp</name> <description>Demo project for Spring Boot</description> <parent> <groupId>org.springframework.boot</groupId> <artifactId>spring-boot-starter-parent</artifactId> <version>1.5.9.RELEASE</version> <relativePath/> <!-- lookup parent from repository --> </parent> <properties> <project.build.sourceEncoding>UTF-8</project.build.sourceEncoding> <project.reporting.outputEncoding>UTF-8</project.reporting.outputEncoding> <java.version>1.8</java.version> </properties> <dependencies> <dependency> <groupId>org.springframework.boot</groupId> <artifactId>spring-boot-starter-web</artifactId> </dependency> <dependency> <groupId>org.springframework.boot</groupId> <artifactId>spring-boot-starter-mail</artifactId> </dependency> <dependency> <groupId>org.springframework.boot</groupId> <artifactId>spring-boot-starter</artifactId> </dependency> <dependency> <groupId>org.springframework.boot</groupId> <artifactId>spring-boot-starter-test</artifactId> <scope>test</scope> </dependency> </dependencies> <build> <plugins> <plugin> <groupId>org.springframework.boot</groupId> <artifactId>spring-boot-maven-plugin</artifactId> </plugin> </plugins> </build> </project>
Gradle - build.gradle
buildscript { ext { springBootVersion = '1.5.9.RELEASE' } repositories { mavenCentral() } dependencies { classpath("org.springframework.boot:spring-boot-gradle-plugin:${springBootVersion}") }}apply plugin: 'java'apply plugin: 'eclipse'apply plugin: 'org.springframework.boot'group = 'com.it1352'version = '0.0.1-SNAPSHOT'sourceCompatibility = 1.8repositories { mavenCentral()}dependencies { compile('org.springframework.boot:spring-boot-starter-web') compile('org.springframework.boot:spring-boot-starter-mail') testCompile('org.springframework.boot:spring-boot-starter-test')}现在,你可以创建一个可执行的JAR文件,并运行Spring Bo通过使用下面显示的Maven或Gradle命令进行应用程序 :
对于Maven,您可以使用如下所示的命令 :
mvn clean install
在"BUILD SUCCESS"之后,您可以在目标目录下找到JAR文件.
对于Gradle,您可以使用如下所示的命令 :
gradle clean build
在"BUILD SUCCESSFUL"之后,您可以在build/libs目录下找到JAR文件.
现在,使用命令运行JAR文件给出以下 :
java –jar <JARFILE>
您可以看到应用程序已在Tomcat端口8080上启动.

现在从Web浏览器中点击以下URL,您将收到一封电子邮件.
http://localhost:8080/sendemail
免责声明:以上内容(如有图片或视频亦包括在内)有转载其他网站资源,如有侵权请联系删除
-
设计总结|如何更好地表达活动品牌?

-

谈谈“目标思维”的落地
编辑导读:我们在做数据分析之前,一定要搞清楚需求方的目标到底是什么,要根据目标来重新定义业务方提出的问题,这就是目标思维。目标思维有多重要呢?应该如何落地呢...
-
在线教育平台竞品分析:网易云课堂vs腾讯课堂
本文从移动端出发,对当前比较热门的两款在线教育平台软件-网易云课堂和腾讯课堂进行比较和分析,不足之处还请大家多提意见。 市场分析 随着国内互联网技术的发展和移...
-
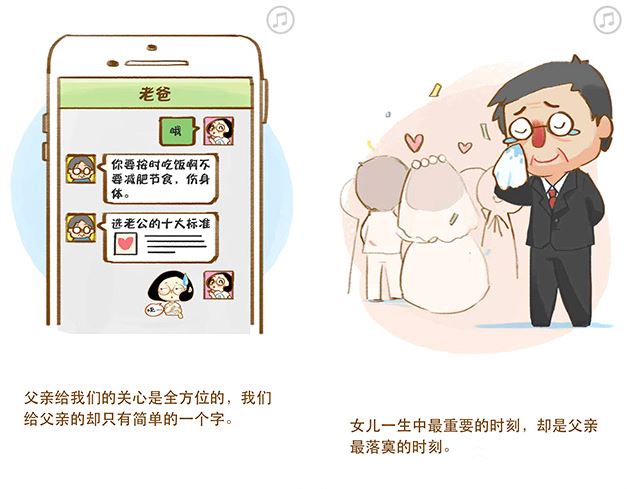
即学即用|父亲节活动的4种运营策略


-
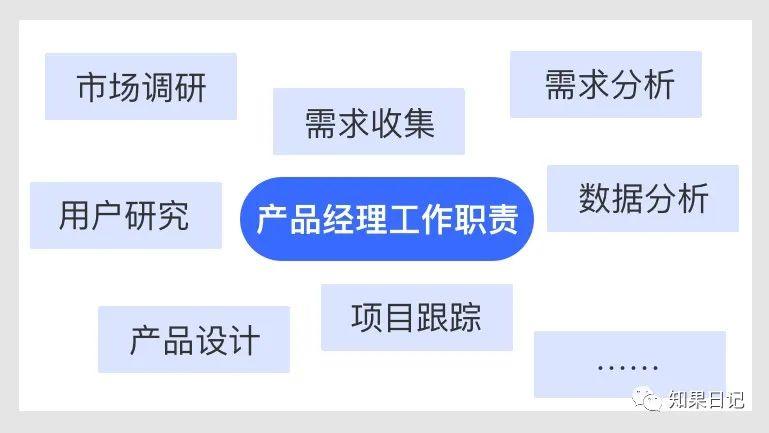
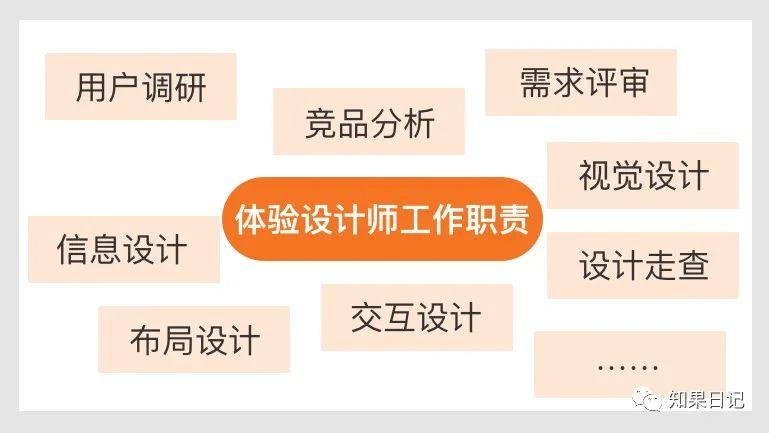
B端产品经理和体验设计师的工作职责边界梳理

-
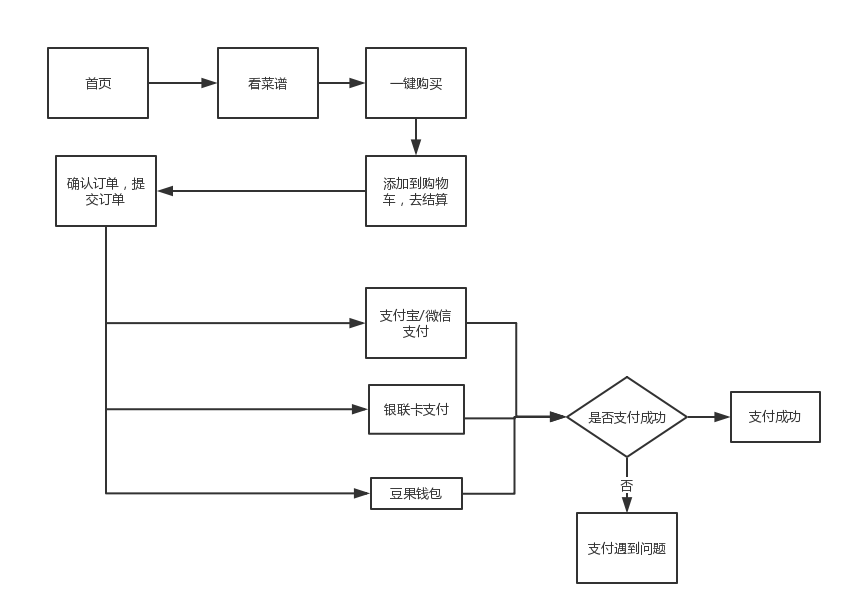
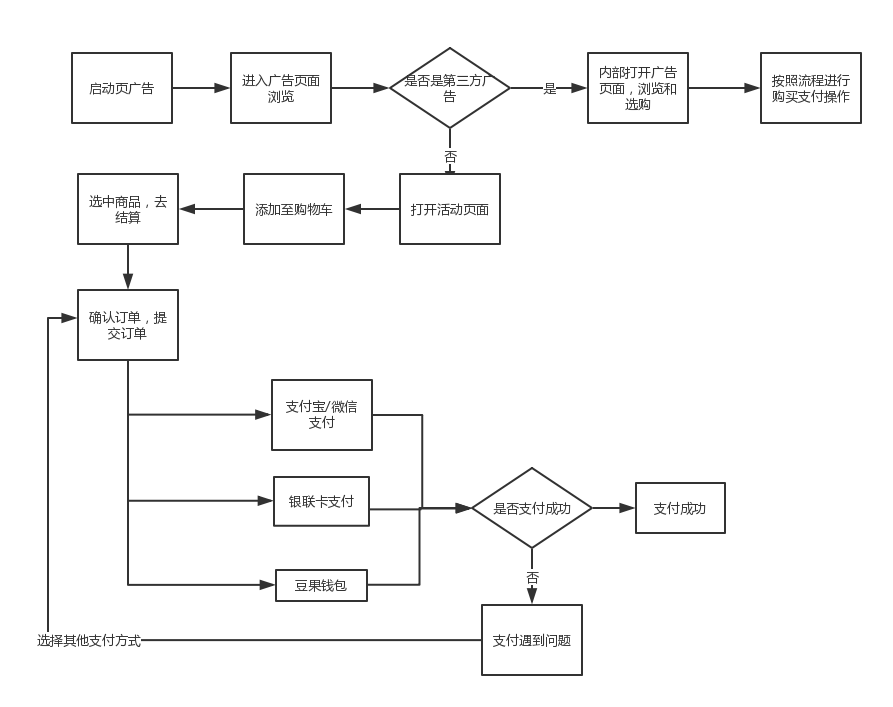
豆果美食电商分支用户体验报告及建议

-

数据分析师如何提高工作效率
在我们的日常工作中,提高工作效率是每个岗位都需要实现的,在工作中,面对比较凌乱的事情时,首先我们需要梳理清楚,按重要级进行开展;本文作者分享了关于...
-
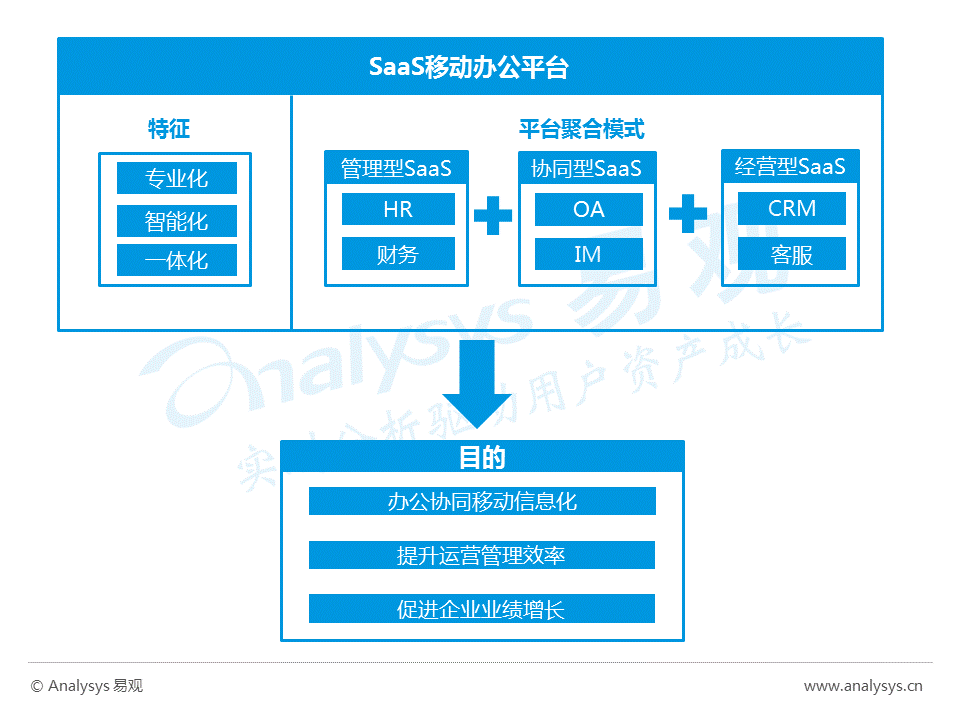
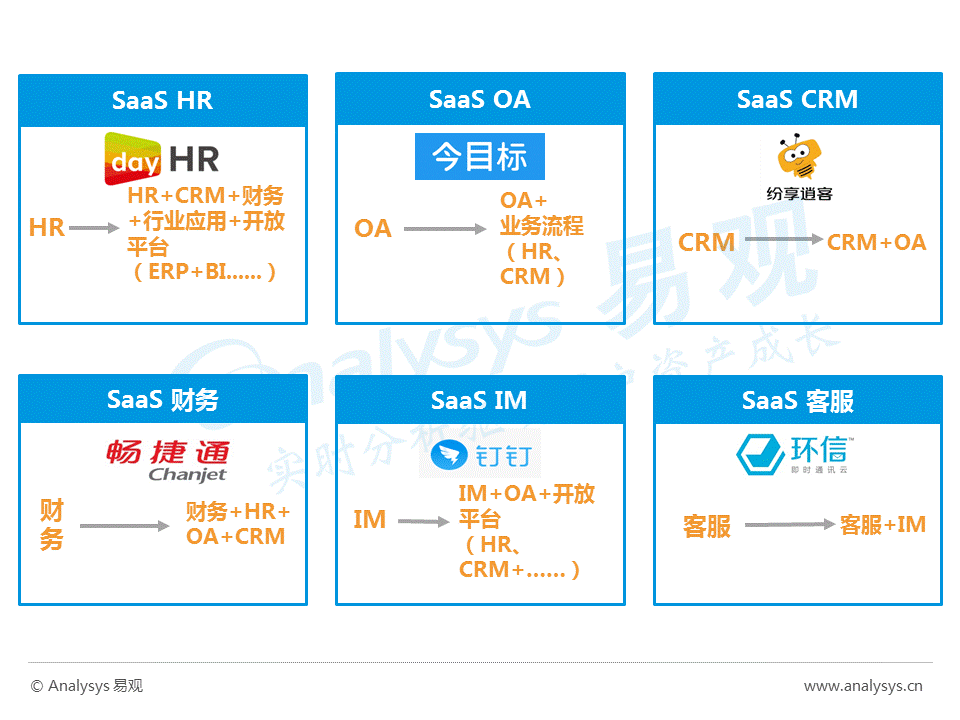
2016中国云计算SaaS移动办公平台年度综合报告

-
网易大布局教育事业:网易公开课、网易云课堂和MOOC分析


-
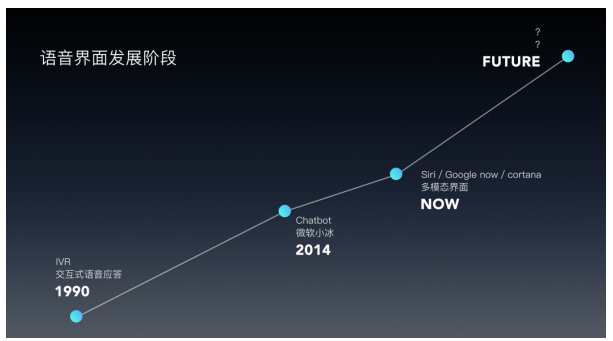
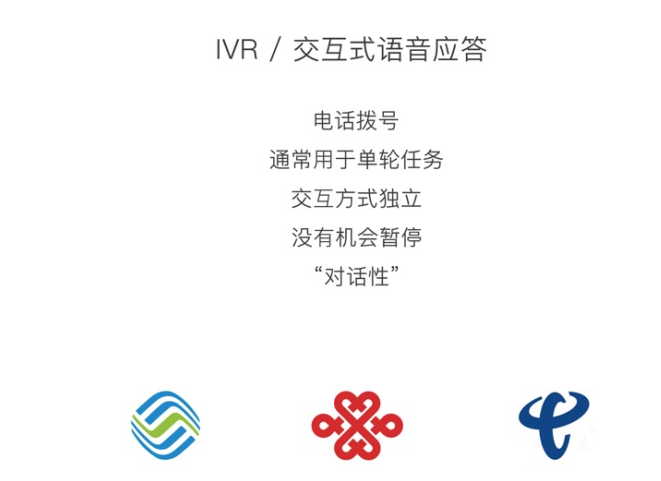
一篇文章搞懂语音交互的来龙去脉